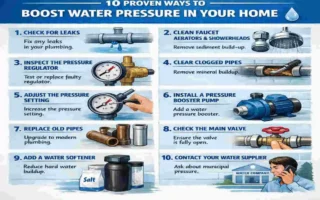
Hey there! If you’re dealing with a pest problem in your home, you’ve probably considered using a bug bomb to get things under control. Bug bombing, also known as fogging, is a popular method to tackle unwanted critters like fleas, roaches, or ants. But here’s the big question on everyone’s mind: how long does it take to bug bomb a house?
What Is Bug Bombing and How Does It Work?
Understanding the Basics of Bug Bombing
Let’s start with the basics. Bug bombing house, or using a total release fogger, is a pest control method where a pesticide mist is released into your home to kill unwanted insects. These little cans are designed to tackle a wide range of creepy crawlies—think fleas, cockroaches, ants, spiders, and even bed bugs in some cases. It’s a go-to solution when you have a severe infestation that regular sprays or traps can’t handle.
How Bug Bombs Get the Job Done

So, how do these foggers work their magic? When you activate a bug bomb, it releases a fine mist of pesticide that spreads throughout the room. This mist penetrates cracks, crevices, and hidden areas where pests tend to hide. The chemicals either kill the bugs on contact or linger long enough to eliminate any that emerge from hiding later. It’s a thorough approach, which is why many people turn to it for significant pest house problems. But here’s the thing: bug bombs don’t work instantly like a magic wand. The mist needs time to settle and do its job, and that’s part of why the timeline matters. Different products target specific pests, so always check the label to ensure you’re using the correct one for your particular issue.
Preparing Your Home Before Bug Bombing
Why Preparation Is Key to Success
Before you even think about setting off a bug bomb, you’ve got to prep your home features. Trust me, this step is just as crucial as the bug bombing itself. Proper preparation not only makes the treatment more effective but also keeps you and your loved ones safe. Additionally, it plays a significant role in determining how long it takes to bug bomb a house.—because skipping steps can delay the process or force you to start over.
Your Step-by-Step Prep Checklist
Let’s break this down into a simple checklist. Follow these steps to get your home ready for bug bombing:
- Clear Out Food and Utensils: Remove or seal up any food, dishes, or cooking tools. You don’t want pesticide residue on the things you eat. Pop them in airtight bags or take them out of the house.
- Secure Pets and Plants: Remove your pets and indoor plants from the area. The chemicals in bug bombs can be toxic to animals and certain types of vegetation. Find a safe spot for them until the process is done.
- Turn Off Pilot Lights and Appliances: Unplug electrical devices and extinguish any pilot lights on stoves or heaters. Bug bomb mist can be flammable, and you don’t want to risk a fire.
- Seal Vents and Detectors: Cover or tape up air vents and house smoke detectors. This prevents the pesticide from spreading to unintended areas or triggering alarms.
How Prep Impacts the Timeline and Effectiveness
You may wonder why all this preparation matters for the timeline. If you don’t clear the space properly, you may have to stop mid-process to correct the issue—or worse, redo the entire treatment. Taking an hour or two to prepare can save you from delays later. A cleaning, uncluttered space allows the fogger’s mist to spread evenly, reaching all those pesky hiding spots.
Minimizing Risks and Exposure
Here’s a quick house tip: open up cabinets and drawers during prep. Bugs love to hide in these spots, and exposing them ensures the pesticide reaches everywhere. But remember to remove anything sensitive first! Also, double-check the bug bomb’s instructions—some products have specific prep tips. By doing this correctly, you reduce health hazards and ensure the treatment works as quickly as possible. Take your time with this step, please.
The Bug Bombing Process – Step-by-Step Timeline

Breaking Down the Timeline for Bug Bombing
Now, let’s get to the heart of the matter: how long does it take to bug bomb a house? The process isn’t just about setting off the fogger and walking away. It involves several phases, each with its own timeframe. I’ll walk you through every step so you know exactly what to expect. Keep in mind that timelines can vary based on the product, house size, and infestation level; however, this is a general house guide to provide a clear picture.
Phase 1: Deployment (0-10 Minutes)
First up is the deployment phase. This is when you activate the bug bomb. It’s super quick—usually just a few minutes. Place the fogger in the center of the house room on a covered surface (like a table with newspaper on it). Shake the can if the instructions say so, press the tab to release the mist, and get out of there fast. Don’t hang around to watch the fog spread; the chemicals are strong, and you don’t want to inhale them.
Phase 2: Fumigation (10-30 Minutes)
Next comes the fumigation phase. This is when the bug bomb releases its pesticide mist into the air. Most foggers take about 10 to 30 minutes to fully empty their contents. During this time, the fog spreads throughout the room, seeping into cracks and corners where pests hide. You won’t be in the house design for this part—everyone, including pets, should be out. Seal up doors and windows as per the product’s instructions to keep the fog contained.
Phase 3: Dwell Time (30 Minutes to 2 Hours)
After the fogger stops releasing mist, it’s time for the dwell phase. This is when the pesticide sits in the air and on surfaces, working to kill off bugs. Depending on the product, this can take anywhere from 30 minutes to 2 hours. Check the label on your bug bomb—some manufacturers recommend a longer dwell time for tougher pests, such as fleas or bed bugs. During this period, your home safety is still off-limits. Patience is key here; cutting this short could mean the treatment doesn’t work fully.
Phase 4: Ventilation (2-4 Hours)
Once the dwell time is up, you move to ventilation. This step is crucial for safety. Open all windows and doors to air out your modern home, allowing fresh air to replace the pesticide-laden atmosphere. Turn on the fans if you have them to speed things up. This usually takes 2 to 4 hours, but it may be longer for larger homes or if the weather isn’t cooperating (such as on a still, humid day). Don’t rush this—breathing in leftover chemicals can be harmful.
Phase 5: Re-Entry Time (After Ventilation)
Finally, there’s the re-entry phase. Once the house is well-ventilated, it’s generally safe to return. Most products say you can return them after 2 to 4 hours of airing out, but always double-check the instructions. Some foggers with more potent chemicals might require a longer wait. Walk in and take a quick sniff—if you still smell a strong chemical odor, give it more time to dissipate. Safety first! This marks the end of the active bug-bombing timeline, although cleaning comes next.
Factors That Affect the Bug Bombing Timeline
Not every bug-bombing job follows the exact same schedule. Here are a few things that can change how long it takes to bug bomb a house:
- House Size and Layout: A small apartment may be quicker to treat and ventilate than a sprawling two-story luxury home with numerous rooms.
- Infestation Severity: A severe pest problem may require multiple foggers or longer dwell times, extending the process.
- Product Type: Different brands and formulas have varying instructions. Always follow the label’s instructions.
Do you have a large house or a persistent infestation? You might be looking at the longer end of these estimates. But don’t worry—I’ll share tips later on how to streamline things.
Why Following the Timeline Matters
I know waiting around for hours isn’t fun, but sticking to this timeline ensures the treatment works and keeps you safe. Rushing back in too soon can expose you to harmful chemicals, and cutting dwell time short may allow pests to survive. So, when you’re wondering how long it takes to bug bomb a house, remember it’s not just about speed—it’s about doing it right. Hang in there, and let’s move to what happens after the fog house clearing.
Post-Bug Bombing Cleaning and Safety Tips

Why Cleaning Is Just as Important as Bombing
Alright, you’ve made it through the bug bombing process, but the work isn’t over yet. Cleaning up after a fogger is essential to eliminate any remaining pesticide residue. This step keeps your home safe for everyone, especially if you’ve got kids or pets. Let’s talk about how to clean effectively and what precautions to take before settling back in.
Cleaning Surfaces and Exposed Items
Start by wiping down all surfaces that might have come into contact with the pesticide mist. Think countertops, tables, and shelves. Use a damp cloth with soapy water to thoroughly clean these areas. Don’t forget about floors—vacuum or mop them to pick up any settled residue. If you left cabinets or drawers open during the treatment, give those a good wipe too. The goal is to eliminate any residual chemical traces from windows that may remain.
Handling Food, Dishes, and Bedding
What about stuff like dishes or bedding? If you didn’t cover or remove them before bug bombing, you’ll need to wash them. Run dishes through the dishwasher or hand-wash them with hot, soapy water. For bedding, toss sheets, pillowcases, and blankets into the washing machine. If anything can’t be washed, like certain toys or fabrics, consider airing them out for a day or two outside the door
Expert Tips for Faster and More Effective Bug Bombing
Choosing the Right Products for the Job
Want to make your bug bombing quicker and more effective? Start with the right tools. Professional-grade foggers often pack a more potent punch than the stuff you grab off the shelf at a hardware store. They cost a bit more, but they can save time by tackling pests all at once. Just make sure you’re comfortable using them—they often come with stricter house safety rules.
Timing Your Treatment for Best Results
Timing matters more than you think. Plan your bug bombing for a day when you can leave the house for several hours—like a weekend when everyone’s out. Also, check the weather. A breezy day can help with ventilation, reducing the need for airing outdoor. Avoid humid or rainy days if possible, as they can slow down the process of clearing out chemical fumes.
Combining Methods for Stubborn Pests

Bug bombing works excellently, but it’s not always a standalone fix. For challenging infestations, pair it with other pest control tricks. Lay down sticky traps or bait stations before and after bombing to catch stragglers. You can also use targeted sprays for high-traffic pest areas. Combining house methods might add a bit to your timeline, but it increases your chances of resolving the problem for good.
Knowing When to Call in Professionals
Here’s a hard truth: sometimes bug bombing isn’t enough. If you’ve got a massive infestation or pests keep coming back, it might be time to hire a professional pest control service. They’ve got access to stronger treatments and can assess your home style for hidden issues (like entry points). Yes, it costs more, but it can save you time and frustration in the long run. Ask yourself: Is DIY worth it if the bugs just won’t quit?
Mistakes That Can Drag Out the Process
Let me warn you about a few common mistakes that can prolong the time it takes to bug bomb a house. First, don’t skimp on prep—leaving food or pets in the area means you’ll have to stop and redo things. Second, avoid using too many foggers at once; follow the recommended number per square footage to prevent overexposure. Lastly, don’t skip ventilation. Rushing back in too soon risks health issues and might force a delay anyway.