When the power goes out, a generator can make a huge difference. It can keep your refrigerator cold, your sump pump running, your lights on, and your family far more comfortable during an outage. For many homeowners, that kind of backup power also brings something just as valuable as electricity: peace of mind.
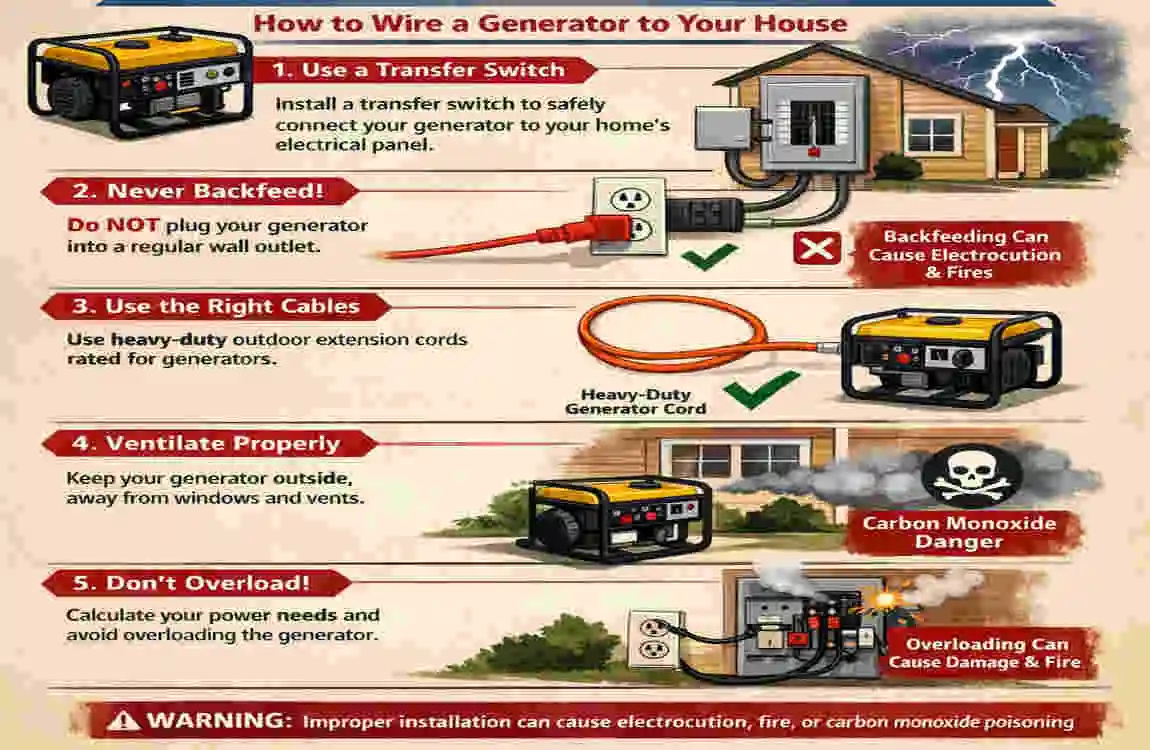
But if you are wondering how to wire in a generator to your house, the first thing to understand is this: safety matters more than convenience. A portable generator is not something you plug into a wall outlet and hope for the best. That dangerous practice is called backfeeding, and it can send power back into utility lines. In the worst case, it can seriously injure or kill utility workers, neighbors, or anyone else touching the grid.
That is why proper generator connections are made through approved equipment, not makeshift setups. The two most common safe methods are a manual transfer switch and a generator interlock kit. Both are designed to prevent your generator from powering the utility lines while still giving you the backup power you need at home.
| Step | What to do | Why it matters |
|---|---|---|
| Choose the right method | Use a transfer switch (manual or auto) or interlock kit; never backfeed via a dryer or window‑AC outlet . | Prevents backfeeding, protects utility workers, and keeps the installation code‑compliant. |
| Select generator capacity | Match generator kW to your essential circuits (lights, fridge, well pump, etc.) and add 20% headroom . | Avoids overloads, tripped breakers, and damaged appliances. |
| Install generator inlet box | Mount outdoor‑rated inlet (L14‑20/L14‑30) near the panel and run a 4‑wire cable (hot‑hot‑neutral‑ground) to the transfer switch or panel . | Provides a safe, dedicated outdoor connection point for the generator cord. |
| Wire to the panel or transfer switch | Connect hot wires to the designated breaker, neutral to the neutral bar, and ground to the ground bar at the main panel or transfer switch . | Matches split‑phase wiring (120/240 V) and keeps neutrals/grounds correctly bonded. |
Safety First: Understanding the Risks
Carbon Monoxide Is a Silent Threat
Portable generators must never be run indoors. That includes basements, garages, crawl spaces, sheds, or any semi-enclosed area. Even if a garage door is open, the space is still not safe enough.
Why? Generators produce carbon monoxide, a colorless and odorless gas that can build up fast and become deadly without warning. People often think they will “just run it for a little while,” but that is exactly when accidents happen. Exhaust can drift into windows, doors, or attic vents, and the danger may not be obvious until it is too late.
The safest approach is simple: keep the generator outside, far from windows, doors, vents, and anything that could allow exhaust to enter the home. It should be placed in a dry, open area where air can move freely around it.
Backfeeding Can Put Lives at Risk
Backfeeding happens when generator power flows the wrong way through your home’s electrical system and into the utility grid. This is one of the biggest reasons generator hookups must be done correctly.
If utility crews think a line is dead and start working on it, backfed electricity can suddenly energize that line. That creates a serious electrocution hazard. Backfeeding can also damage your home’s appliances, your generator, and your electrical panel.
This is why safe generator installations use a transfer device of some kind. That device makes sure your home is either connected to the utility or connected to the generator—not both at the same time.
Why Professional Help Is So Important
Even if you are comfortable around tools, electrical work in this area is not the same as swapping a light switch or replacing a receptacle. You are dealing with your home’s main electrical system, load limits, grounding, bonding, and code requirements.
A licensed electrician understands local rules, NEC standards, permit requirements, and the right way to match the generator system to your home’s panel. In many places, this work must be inspected before it can be used legally.
So while it is useful to understand the process, it is wise to treat generator wiring as a professional safety project, not a casual weekend task.
Assessing Your Power Needs
Start with the Essentials
Before you choose a generator connection method, you need to know what you actually want to power. Most homeowners do not need every circuit in the house running during an outage. In fact, that is often unrealistic unless you have a very large standby setup.
Instead, think in terms of essential loads. These are the items you most need during an outage, such as:
- Refrigerator or freezer
- Sump pump
- Furnace blower or boiler controls
- A few lights
- Internet equipment or phone charging
- Medical equipment, if needed
Each of these appliances uses a certain number of watts. Some need extra power when they start up, especially motors like refrigerators, pumps, and fans. That startup surge matters when sizing the generator and the wiring system.
How to Estimate Your Load
A good way to begin is to make a list of every essential appliance you want to run. Then write down the running watts and starting watts if available. Add them up carefully.
For example, a refrigerator may use only a few hundred watts while running, but it can briefly need much more when it starts. A sump pump may not run often, but when it does, it may draw a strong surge. If your system is undersized, the generator may trip, struggle, or fail to support the load.
This is why load planning matters so much. A system that works on paper but ignores startup demand will not work well in the real world.
20A vs. 30A Systems
Most portable generator setups for homes fall into common service levels like 20-amp or 30-amp connections. The right one depends on what you want to power.
A 20A setup may be enough for very light backup needs, such as a few lights and a refrigerator. A 30A setup usually gives you more flexibility and is often better for a typical emergency plan.
The main point is this: choose the system that matches your real needs, not just the biggest number available. Bigger is not always better if the generator, inlet, cord, or panel is not designed for it.
Circuit Selection vs. Whole-Panel Backup
You also need to decide whether you want to power only a handful of circuits or something closer to a whole-panel approach.
A selected-circuit setup is common for homes that only need the basics. It is simpler, easier to manage, and usually cheaper.
A whole-panel approach can power more of the home, but it requires more generator capacity and more careful load control. If the generator cannot handle the total demand, you may need to turn off certain loads manually.
The more realistic your planning is, the better your generator system will perform during an outage.
Two Approved Methods: Which Is Best?
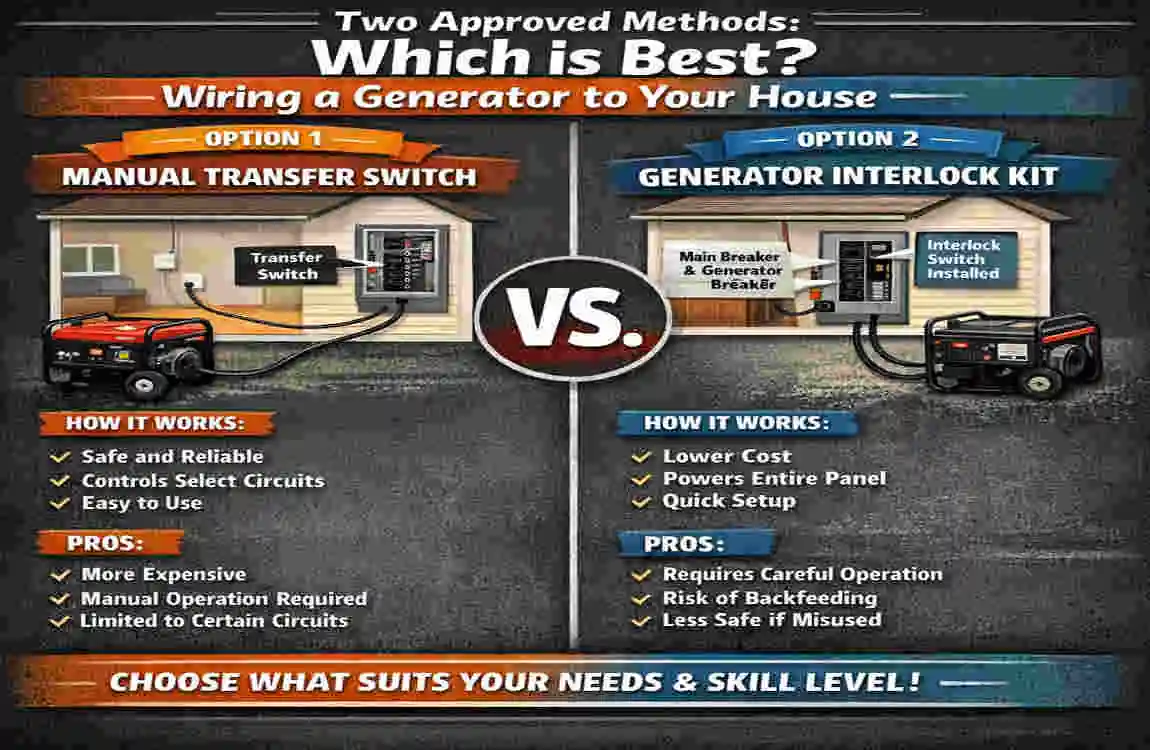
Method A: Manual Transfer Switch
A manual transfer switch is one of the safest and most organized ways to connect a portable generator to a home. It creates a clear separation between utility power and generator power, so the two never overlap.
This method usually feeds a set of selected circuits through a dedicated switch or sub-panel. During an outage, you move those circuits from utility power to generator power using the transfer mechanism.
Why Homeowners Like It
The biggest advantage is safety and simplicity. The switch provides mechanical separation, which makes the setup easy to understand and reduces the chance of dangerous mistakes. It also makes it obvious which circuits are intended for backup power.
Another benefit is routine use. Once installed properly, the process of starting the generator and switching power is straightforward.
What to Keep in Mind
The downside is that a transfer switch typically supports only specific circuits. If you later decide you want to power more parts of the house, you may need to revise the setup.
It may also require more equipment and more labor to install because a sub-panel or dedicated switch panel is often involved. That means the upfront cost can be higher.
Method B: Generator Interlock Kit
A generator interlock kit is another approved method used with a home’s main electrical panel. It works by physically preventing the main breaker and the generator breaker from being on at the same time.
This setup can be a smart choice for homeowners who want more flexibility. Instead of limiting backup power to only a few fixed circuits, it often lets you choose which circuits to energize—within the limits of your generator size.
Why Homeowners Like It
The main advantage is flexibility. You can often power a wider variety of circuits, as long as you manage your electrical load carefully. It can also be more cost-effective than a full transfer switch arrangement in some homes.
For many people, that makes the interlock kit appealing when they want practical backup power without building a separate sub-panel.
What to Keep in Mind
The tradeoff is that it requires careful manual switching and a clear understanding of breaker control. The homeowner must follow the correct sequence every time. If the process is not followed properly, safety is compromised.
It is also important to make sure the interlock is specifically designed for the panel being used. Not every kit fits every panel, and using the wrong one is not acceptable.
Comparison Table
FeatureManual Transfer SwitchGenerator Interlock Kit
The main purpose of the Powers is to select circuits through a dedicated switch. It lets you use the main panel with a controlled breaker interlock
Safety control , strong mechanical isolation , and physical prevention of main and generator breakers being on together
Flexibility Limited to chosen circuits . More flexible circuit selection
Installation complexity : Often more involved , often simpler in some homes, but still code-sensitive
Cost : Usually higher upfront , often more budget-friendly
Best for Homeowners who want a clearly defined backup circuit setup , homeowners who want flexibility, and understand load management
Which One Should You Choose?
There is no one-size-fits-all answer. If you want a clean, dedicated backup system with only a few essential circuits, a transfer switch may be the better fit. If you want flexibility and your electrical panel supports it, an interlock kit may be a better match.
Either way, the key is not just choosing a device. It is choosing a code-compliant, professionally installed system that fits your home and generator properly.
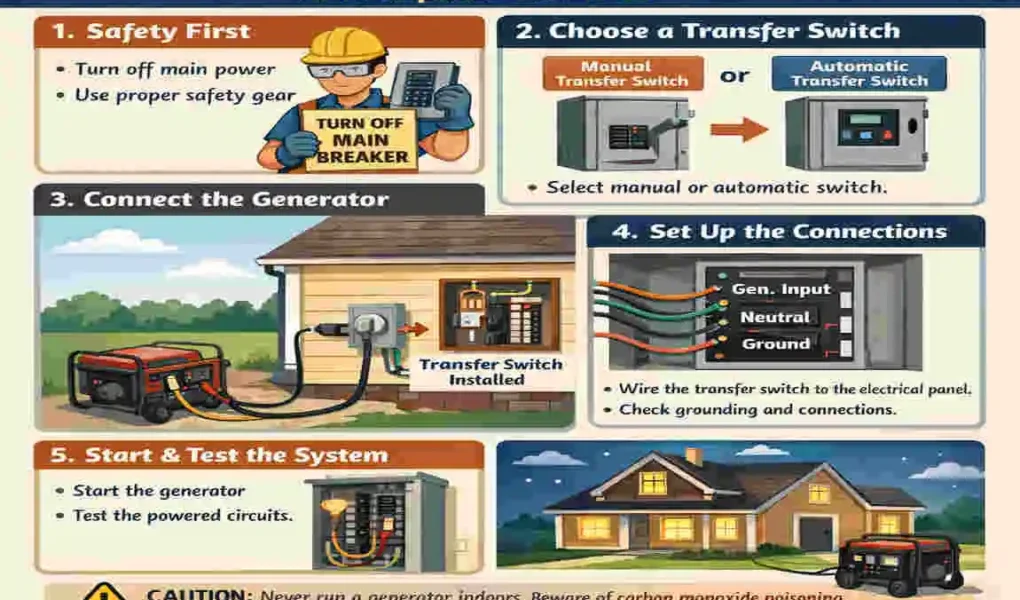
Step-by-Step: The Installation Process
Before You Start: Planning Comes First
If you are serious about how to wire in a generator to your house, do not begin with tools. Begin with planning.
The first step is confirming your generator size, your intended loads, and the approved connection method for your home. You also want to verify local permit requirements and inspection rules. In many areas, generator wiring is not just recommended to be inspected—it is required.
A licensed electrician will usually review the home’s panel, the generator’s output, and the best location for the inlet box or transfer equipment. This matters because the installation has to match the electrical system, not just the homeowner’s preferences.
Gather the Right Tools and Materials
A proper installation may involve tools such as:
- Wire strippers
- Screwdrivers
- Drill and bits
- Voltage tester or multimeter
- Cable supports or clamps
- Mounting hardware
- Weatherproof outdoor electrical box
- Approved cable and fittings
The specific materials depend on the chosen method and the home’s panel setup. The important thing is to use approved parts that match the load and outdoor conditions.
Do not assume that any cable or box will do. Generator connections need equipment rated for the job, especially because the inlet point sits outside and must withstand weather exposure.
Install the Inlet Box
The inlet box is the outdoor connection point where the generator plugs into the home system. It is usually mounted on an exterior wall in a convenient, protected location.
This box must be:
- Weatherproof
- Properly mounted
- Easy to reach
- Located where the generator cord can safely reach
The inlet box is often set at a height that keeps it above standing water and away from areas where splash, snow, or lawn equipment could cause damage.
The choice of inlet type should match the generator cord and the expected amperage, such as an L14-20 or L14-30 style inlet, depending on the system design. The exact selection should be coordinated with the electrician and equipment ratings.
Run the Wiring Safely
From the inlet box, wiring must be routed to the transfer switch, interlock setup, or panel connection point. This part of the job should follow code, local rules, and the manufacturer’s instructions.
The wiring path should be protected, neatly supported, and kept away from damage. It may involve running cable through a wall, attic, basement, crawl space, or conduit, depending on the home’s layout.
This is one reason generator installation is not just about convenience. It is about proper electrical routing and protection. Loose, exposed, or poorly secured wiring is not acceptable.
In many cases, a 4-wire cable is used for portable generator hookups because the system needs the correct conductors for power and grounding functions. However, the exact cable and conductor arrangement must be chosen based on the installation method and local code.
Grounding and Bonding Must Be Correct
Grounding and bonding are often misunderstood, but they are critical to safety. These terms refer to the way electrical systems are tied together so fault current can travel safely and protective devices can operate as intended.
This is not a step where guesswork is acceptable. The generator, inlet, and home panel must be configured in a way that fits the system design and local code requirements.
Some generator setups are designed with a specific neutral/ground arrangement, and others have different requirements depending on whether the generator is a separately derived system or not. That is why the electrician’s role is so important here.
The takeaway is simple: grounding and bonding are not optional details. They are part of what makes the whole system safe and legal.
Connect to the Panel or Switch
Once the inlet and wiring are in place, the final connection is made to the transfer switch or main panel arrangement.
With a transfer switch, circuits are usually routed through the switch or sub-panel so they can be selected during an outage. With an interlock kit, the generator breaker is installed in the panel, and the interlock hardware is used to prevent improper breaker use.
This stage must be done carefully because panel work is where many of the most serious mistakes happen. Proper labeling, breaker sizing, and tight, secure connections matter a great deal.
A panel that looks “mostly fine” is not good enough. It needs to be correct, clean, and inspected if required.
Label Everything Clearly
Once the work is complete, the system should be labeled in a way that makes sense during a power outage. That includes identifying the generator inlet, the generator breaker, and the circuits intended for backup power.
Clear labels help prevent confusion when stress is high. When the power is out and it is dark, the last thing you want is to guess which breaker does what.
Good labeling is not just a convenience. It is a safety habit.
Why a Licensed Electrician Matters Here
This entire process sounds simple when broken into parts, but the reality is that each step interacts with the others. A small mistake in planning, wiring, grounding, or panel setup can create a serious hazard.
A licensed electrician helps ensure the installation is done with the right equipment, the right sizing, and the right protections. They also help make sure the home passes inspection and complies with the NEC and local requirements.
If your goal is dependable backup power, professional installation is one of the best investments you can make.
Testing and Maintenance
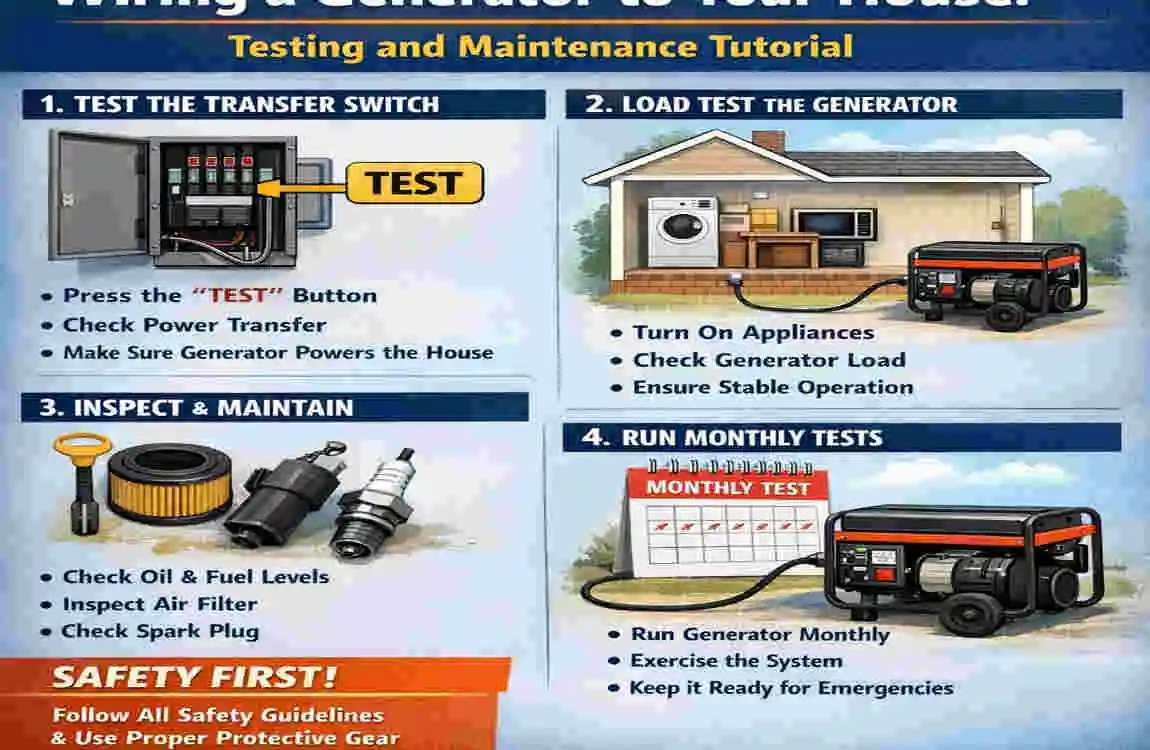
Test the System Before You Need It
Do not wait for a storm to discover a problem. Once the installation is complete and inspected, the system should be tested under controlled conditions.
Testing checks whether the generator starts properly, whether the inlet and cord connection work, and whether the transfer mechanism functions as intended. It also helps confirm that the selected circuits receive power correctly.
A proper test gives you confidence that the system is ready for an actual outage.
Verify the Safety Controls
One of the most important checks is making sure utility power and generator power cannot overlap.
This is the heart of the safety system. Whether you use a transfer switch or an interlock kit, the design must prevent backfeeding. If the system is not doing that correctly, it is not safe to use.
A professional will usually verify breaker operation, voltage, and correct sequencing during testing.
Keep Up With Routine Maintenance
A generator system is not something you install once and forget forever. It needs regular attention.
Basic maintenance may include:
- Starting the generator periodically
- Checking fuel levels and fuel freshness
- Inspecting the inlet box for corrosion or damage
- Looking over the cable for wear or cracks
- Making sure labels remain visible
- Testing the transfer operation from time to time
The outlet box, cable, and breaker connections should also be inspected after severe weather or if anything has been bumped or exposed to moisture.
A well-maintained system is much more likely to work when you need it most.
Frequently Asked Questions
Can I do this work myself if I’m experienced with wiring?
Some homeowners have strong electrical experience, but generator hookup work still carries a serious risk. The issue is not just whether you can connect wires. It is whether the full system is safe, code-compliant, correctly sized, and inspected where required.
If you are experienced, you’ll likely understand the process better than most people. Even so, many parts of the job are best handled by a licensed electrician, especially panel work and final verification.
What is the difference between a transfer switch and an interlock?
A transfer switch usually feeds selected circuits through a dedicated device or sub-panel. It is organized and easy to understand.
An interlock kit works with the main panel and physically blocks the main breaker and generator breaker from being on at the same time. It is often more flexible, but it depends on careful manual operation.
Both are approved methods when installed correctly.
Do I need a permit for generator installation?
In many places, yes. Generator installations often involve electrical permits and inspection requirements. Local codes can vary, but permit rules are common because the work affects home safety and utility protection.
A licensed electrician can usually tell you what applies in your area and help you handle the process properly.
What should I do if my generator won’t start during an outage?
If your generator will not start, stay calm and check the basics first. Make sure it has fuel, the fuel valve is open if applicable, the choke is set correctly, and the battery is charged if your model uses one.
You should also confirm the unit has been maintained recently. Old fuel, dirty spark plugs, or neglected service can cause startup failure. If the issue is not obvious, have the generator serviced before the next emergency.
The worst time to discover a problem is during a storm, so routine testing is always worth the effort.
How often should I test my setup?
A good habit is to test the generator and the transfer system on a regular schedule, such as every month or every few months, depending on how your electrician recommends managing the setup. The goal is to catch issues before an outage does.
Even if you do not run a full load test every time, a brief startup and inspection routine can reveal problems early.