Are you dreaming of a bathroom upgrade that will transform your space into a luxurious retreat? Installing a new vanity is a fantastic way to achieve that. But what if your existing plumbing is in the way? Don’t worry!
Understanding Bathroom Plumbing and Vanity Basics
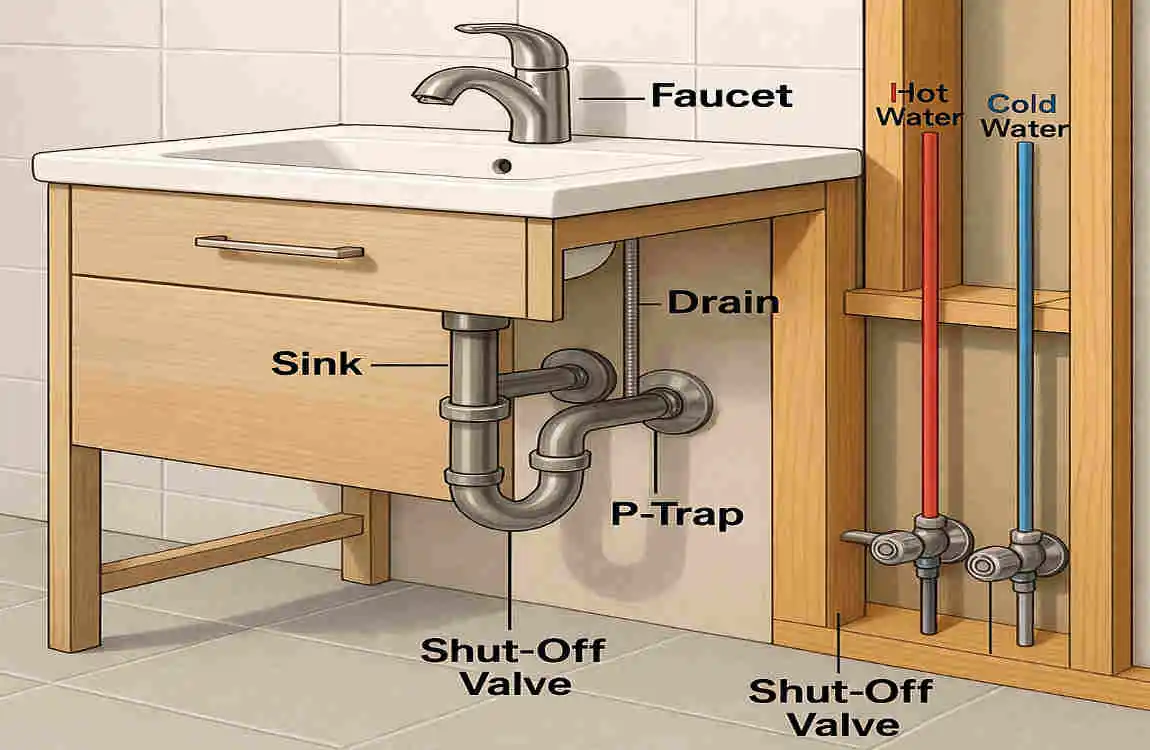
Common Bathroom Plumbing Setup
Before we start installing your new vanity, it’s crucial to understand the basics of bathroom plumbing. Most bathrooms have a sink, a drain, and water supply lines that need to be considered during installation.
The sink drain carries wastewater away, while the water supply lines deliver fresh water to your faucet. These components are typically located beneath the sink, which can make installing a vanity a bit tricky. But don’t worry, we’ll show you how to navigate this challenge with ease.
Types of Bathroom Vanities and Compatibility with Plumbing
When it comes to bathroom vanities, there are various styles and designs to choose from. Some vanities come with a built-in sink and countertop, while others require separate installation.
It’s essential to consider the compatibility of your chosen vanity with your existing plumbing. Some vanities have adjustable legs or feet that can accommodate different plumbing heights, while others may require more significant modifications.
Before making a final decision, please review your plumbing setup and choose a vanity that works seamlessly with it.
Why Knowing Your Plumbing Layout Matters
Understanding your plumbing layout is crucial for a successful vanity installation. Knowing the location and configuration of your pipes ensures your new vanity fits perfectly and functions appropriately.
Take the time to inspect your plumbing and make note of any potential obstacles or challenges. This information will be invaluable as you move forward with the installation process.
Tools and Materials Typically Needed
To Install a vanity over home plumbing, you’ll need a few essential tools and materials. Here’s a handy list to help you prepare:
- Adjustable wrench
- Screwdriver
- Level
- Measuring tape
- Shims
- Plumber’s putty
- Silicone caulk
- Vanity and sink (if separate)
- Faucet and drain assembly
Having these items on hand will make the installation process much smoother and more efficient.
Preparing for Vanity Installation Over Existing Plumbing
Measuring Your Space Accurately
Before you start installing your new vanity, it’s crucial to measure your space accurately. This will ensure that your vanity fits perfectly and aligns with your existing plumbing.
Start by measuring the width, depth, and height of the area where you plan to Install the vanity. Take note of any obstacles, such as pipes or walls, that may affect the placement of your vanity.
Once you have your measurements, compare them to the dimensions of your chosen vanity. Make sure there’s enough clearance for the vanity to fit comfortably and allow for proper plumbing connections.
Turning Off the Water Supply and Safety Tips
Before you begin any plumbing work, it’s essential to turn off the water supply to your bathroom. This will prevent any accidental leaks or floods during the installation process.
Locate the main water shut-off valve for your home and turn it clockwise until it’s fully closed. Then, open the faucets in your bathroom to release any remaining water pressure.
While working with plumbing, always prioritize safety. Wear protective gloves and eyewear, and use caution when handling tools and materials. If you’re unsure about any aspect of the process, don’t hesitate to seek professional help.
Inspecting Existing Plumbing for Leaks or Repairs
Before installing your new vanity, inspect your existing plumbing for leaks or damage. Look for signs of moisture, mineral deposits, or corrosion around the pipes and connections.
If you notice any issues, address them before proceeding with the installation. Tighten loose connections, replace damaged pipes, and repair any leaks to ensure a solid foundation for your new vanity.
Clearing the Space and Protecting Floors and Fixtures
To make the installation process as smooth as possible, clear the area around your vanity. Remove any obstacles, such as toiletries or decorations, that may get in the way.
Protect your floors and nearby fixtures by laying down a drop cloth or old towels. This will catch any debris or spills during the installation process and prevent damage to your bathroom surfaces.
Pre-Installation Checklist
Before you start installing your new vanity, run through this handy checklist to ensure you’re fully prepared:
- Measure your space accurately
- Turn off the water supply
- Inspect existing plumbing for leaks or repairs
- Clear the space and protect floors and fixtures
- Gather all necessary tools and materials
By following this checklist, you’ll be well on your way to a successful vanity installation over your home plumbing.
Step-by-Step Guide to Install a Bathroom Vanity Over Plumbing

Assemble or Prepare the Vanity for Installation
The first step in installing your new vanity is to assemble or prepare it for installation. If your vanity comes in pieces, follow the manufacturer’s instructions for assembly.
If your vanity is a single unit, make sure it’s ready for installation by removing any packaging or protective coverings. Double-check that all the necessary hardware, such as screws or brackets, is included and accessible.
Position the Vanity Carefully Over the Plumbing
Now it’s time to position your vanity carefully over the existing plumbing. Start by moving the vanity into place, ensuring that it’s centered and aligned with the plumbing connections.
Take your time during this step, as proper positioning is crucial for a successful installation. If needed, have a friend help you lift and maneuver the vanity into place.
Adjust the Vanity Height and Level Using Shims if Needed
Once your vanity is in position, you may need to adjust its height and level to ensure proper alignment with the plumbing. Use shims, which are thin wedges of material, to raise or lower the vanity as needed.
Place the shims under the vanity’s legs or base, adjusting them until the vanity is level and at the correct height. Use a level tool to check your work and make any necessary adjustments.
Connect the Water Supply Lines to the Faucet
With your vanity in place and leveled, it’s time to connect the water supply lines to the faucet. Start by attaching the hot and cold water supply lines to the corresponding wall valves.
Use an adjustable wrench to tighten the connections, being careful not to over-tighten and risk damaging the pipes. Once the supply lines are securely connected, attach them to the faucet according to the manufacturer’s instructions.
Attach the Drain Pipe to the Sink Drain and Ensure Airtight Seals
Next, attach the drain pipe to the sink drain. Apply a thin layer of plumber‘s putty around the drain opening on the sink, then press the drain flange into place.
From beneath the sink, attach the drain pipe to the flange, using slip nuts and washers to secure the connection. Tighten the nuts by hand, then use a wrench to give them an additional quarter turn.
To ensure an airtight seal, apply a bead of silicone caulk around the drain flange where it meets the sink. This will help prevent leaks and keep your bathroom looking its best.
Test All Plumbing Connections for Leaks and Tighten as Necessary
Before you secure your vanity to the wall, it’s crucial to test all the plumbing connections for leaks. Turn the water supply back on and check each connection carefully for any signs of moisture or dripping.
If you notice any leaks, tighten the connections as necessary until the leaks stop. Be patient and thorough during this step, as even a small leak can lead to significant problems down the line.
Secure the Vanity to the Wall Using Brackets or Screws
With all the plumbing connections in place and leak-free, it’s time to secure your vanity to the wall. Most vanities come with brackets or screws designed for this purpose.
Locate the wall studs behind your vanity and mark their positions. Then, attach the brackets or screws to the back of the vanity, aligning them with the studs. Use a drill to secure the vanity to the wall, ensuring a sturdy and stable installation.
Install Countertop and Sink if Separate from Vanity Base
If your vanity has a separate countertop and sink, now’s the time to Install them. Follow the manufacturer’s instructions to secure the countertop to the vanity base, using adhesive or clips as needed.
Once the countertop is in place, Install the sink according to the manufacturer’s guidelines. Apply a bead of silicone caulk around the sink’s edge to create a watertight seal and prevent leaks.
Troubleshooting Common Issues During Installation
During installation, you may encounter a few common issues. Here are some tips for troubleshooting and resolving them:
- If your vanity doesn’t fit properly over the plumbing, try using shims to adjust its height and position.
- If you’re having trouble connecting the water supply lines, double-check that you’re using the correct fittings and that the connections are tight.
- If you notice leaks after testing the plumbing connections, tighten the affected areas and re-test until the leaks stop.
Remember, patience and persistence are key when troubleshooting. If you’re unsure about how to resolve an issue, don’t hesitate to seek professional help.
Safety Reminders and Tips to Avoid Plumbing Damage
Throughout the installation process, keep safety in mind and take steps to prevent damage to your plumbing. Here are some essential safety reminders and tips:
- Always turn off the water supply before working on any plumbing connections.
- Use caution when handling tools and materials, wearing protective gloves and eyewear as needed.
- Avoid over-tightening connections, as this can lead to damage or leaks.
- If you’re unsure about any aspect of the process, seek professional help rather than risking damage to your plumbing.
By following these safety tips, you’ll be well on your way to a successful and damage-free vanity installation.
Essential Tips for a Long-Lasting Vanity Installation
Using Quality Fixtures and Materials for Durability
To ensure a long-lasting vanity installation, it’s crucial to use quality fixtures and materials. Invest in a sturdy vanity that’s built to withstand daily use and resist moisture and humidity.
Choose a high-quality faucet and drain assembly that will function reliably for years to come. And don’t skimp on caulk and putty—use top-notch products to create airtight seals and prevent leaks.
Regular Maintenance Tips to Avoid Plumbing Problems
To keep your vanity installation in top shape, follow these regular maintenance tips:
- Check the plumbing connections periodically for leaks or signs of wear.
- Clean the sink and faucet regularly to prevent mineral buildup and keep them sparkling.
- Wipe down the vanity surface to remove moisture and prevent water damage.
- If you notice any issues, address them promptly to avoid more significant problems down the line.
By staying on top of maintenance, you’ll enjoy a long-lasting and trouble-free vanity installation.
Handling Tight Spaces or Unusual Plumbing Layouts
If you’re working with tight spaces or unusual plumbing layouts, don’t panic! With a bit of creativity and flexibility, you can still achieve a successful vanity installation.
Consider using a compact or corner vanity to maximize your space. If your plumbing is in an unusual location, you may need to use flexible supply lines or adjust the vanity’s position to accommodate it.
Don’t be afraid to think outside the box and find a solution that works for your unique situation.
When to Call a Professional Plumber for Complex Setups
While many vanity installations can be completed as a DIY project, there are times when it’s best to call in a professional plumber. If you’re dealing with a complex setup, such as a multi-sink vanity or unusual plumbing configuration, a pro can help ensure a successful installation.
If you’re unsure about any aspect of the process or encounter issues that you can’t resolve on your own, don’t hesitate to seek professional help. A plumber can provide expert guidance and assistance to get your vanity installed correctly and safely.
Cost and Time Estimates for Installing a Vanity Over Plumbing

Average Cost Breakdown for Materials and Tools Needed
The cost of installing a vanity over home plumbing can vary depending on the materials and tools you choose. On average, you can expect to spend:
- Vanity: $100-$1,000, depending on size, style, and quality
- Faucet: $50-$300
- Drain assembly: $20-$100
- Plumbing supplies (e.g., supply lines, putty, caulk): $20-$50
- Tools (e.g., wrench, screwdriver, level): $20-$100 if you don’t already own them
Overall, the total cost of materials and tools can range from $210 to $1,550, depending on your choices and what you already have on hand.
Time Required for DIY Installation vs. Hiring a Professional
The time required for a vanity installation can vary depending on your skill level and the job’s complexity. On average, a DIY installation can take:
- 2-4 hours for a straightforward installation with a pre-assembled vanity
- 4-8 hours for a more complex installation with a vanity that requires assembly or custom plumbing work
If you choose to hire a professional plumber, the installation may take 1-3 hours, depending on the job’s complexity. Keep in mind that you’ll need to factor in labor costs, which can range from $50 to $150 per hour.
Budget-Friendly Tips Without Compromising Quality
If you’re looking to save money on your vanity installation without sacrificing quality, consider these budget-friendly tips:
- Shop around for the best deals on vanities, faucets, and other materials.
- Consider a pre-assembled vanity to save on assembly time and costs.
- Use flexible supply lines to accommodate unusual plumbing layouts without the need for custom work.
- Install it yourself if you’re comfortable with the process, rather than hiring a professional.
By being savvy with your choices and doing some of the work yourself, you can achieve a high-quality vanity installation without breaking the bank.
FAQs Section
Can I Install a vanity over plumbing on my own?
Yes, you can definitely Install a vanity over the plumbing yourself, especially if you follow our step-by-step guide. However, if you’re dealing with a complex setup or feel unsure about any aspect of the process, it’s always best to seek professional help.
What plumbing problems should I watch for during installation?
During the installation process, keep an eye out for leaks, loose connections, and signs of wear or damage on your existing plumbing. If you notice any issues, address them promptly to avoid more significant problems down the line.
How do I choose the right vanity for existing plumbing?
When choosing a vanity for your existing plumbing, consider the size, style, and compatibility with your plumbing layout. Measure your space carefully and choose a vanity that fits comfortably and allows for proper plumbing connections.
How to fix a leaky drain or faucet connection after installation?
If you notice a leaky drain or faucet connection after installation, start by tightening the affected area. If the leak persists, you may need to disassemble the connection and apply new plumber’s putty or caulk to create an airtight seal. If you’re unsure about how to fix the issue, don’t hesitate to call a professional plumber for help.